Quick Tip: Quickly Convert CMYK to Pantone
Have you ever found yourself rushing a file for the printer, but your client hasn't specified a spot color for their design?
Finding a spot color equivalent to CMYK can be difficult. What your client sees is often different from what you see. Here's a quick way to find the Pantone© equivalent for a CMYK process color without the use of a color book. This tip is perfect for designers who need to use professional offset printing.
Follow along with us over on our Envato Tuts+ YouTube channel:
Method #1: CMYK to Pantone
Step 1
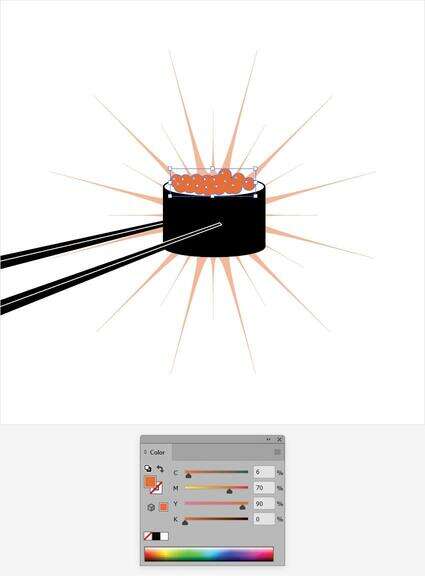
Let's say you get this logo from a designer.
Select the shape highlighted in the following image and focus on the Color panel (Window > Color) to inspect the current fill color. You can see that the orange is made up of 6% cyan, 70% magenta, and 90% yellow. These three colors plus black make for a four-color job. Now, you might want to turn it into a two-color job, and you want that orange to be the same color anytime anybody prints it.
In the following steps, you will learn how to make this change and avoid scrolling through 1,000+ Pantone colors looking for the perfect match.
Step 2
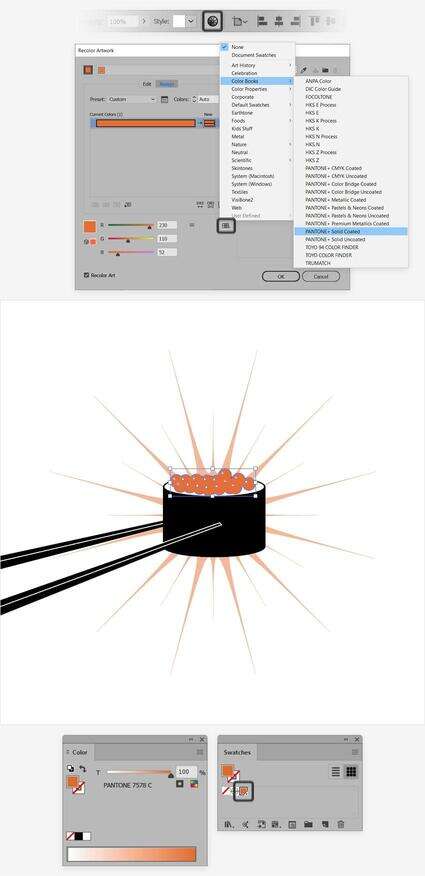
Make sure that your shape is still selected. To find your perfect Pantone, go to Edit > Edit Colors > Recolor Artwork (or click the Recolor Artwork button from the control panel).
In the newly opened dialog box, click the highlighted button to limit the color changes to the color library that you're about to specify. Go to Color Books > PANTONE+ Solid Coated. Looking back at the Color panel, you will see that the orange has been converted into a Pantone, and the Pantone spot color swatch has been added inside the Swatches panel (Window > Swatches).
Step 3
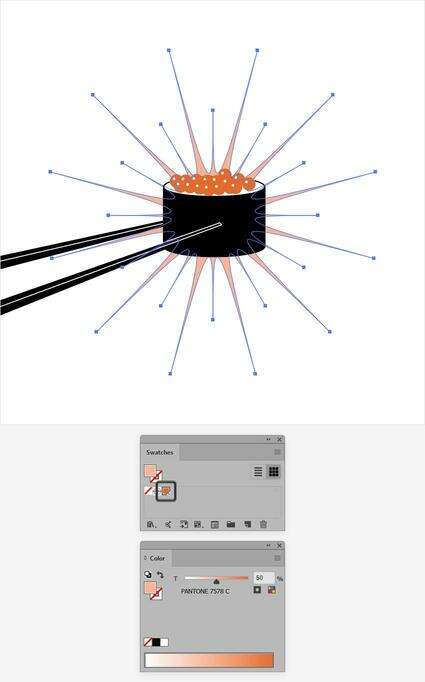
Now, you can select that starburst shape, assign that same Pantone color from the Swatches panel, and lower its tint to about 50%.
So with the black and the Pantone orange, you have a two-color printing job.
Method #2: CMYK to Pantone (Two-Color Job)
Step 1
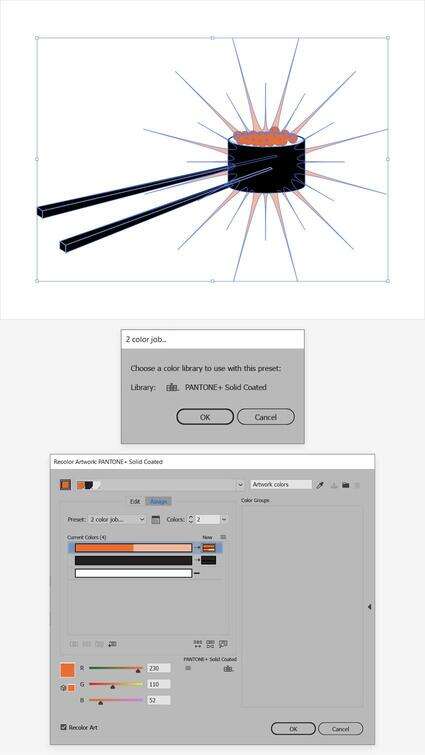
Select everything in the logo and go to Edit > Edit Color > Recolor with Preset > 2 color.... Choose the PANTONE+ Solid Coated library and click OK to open the Recolor Artwork window. Here you can change the presets if you ever change your mind. This is not the case, so click OK.
Step 2
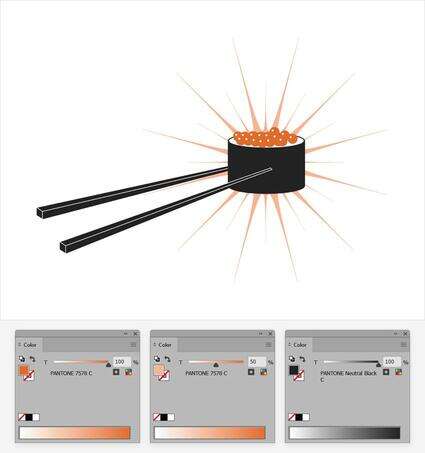
Now you can see that the darker orange is the Pantone, the lighter orange is the same Pantone with a 50% tint, and the black is a Pantone process black.
Voila!
There you have it! A two-color print job with just a few clicks.
Adobe Photoshop
Photoshop in 60 Seconds: RGB vs. CMYK
Melody Nieves
Adobe Illustrator
The Ultimate Guide to Adobe Illustrator Swatches
Andrei Stefan
Branding
How to Create Your Own Brand Guidelines
Grace Fussell
InDesign Templates
How to Make a Fancy Menu Template
Grace Fussell
Brochure
How to Create a Product Brochure Template in Adobe InDesign
Grace Fussell
Brochure
How to Create a Science Brochure Template in Adobe InDesign
Grace Fussell
Book Cover
How to Design a Romance Book Cover
Monika Zagrobelna
Brochure
How to Make a Business Brochure in InDesign
Grace Fussell
Brochure
How to Make a Brochure
Grace Fussell